High Tack
Polyurethane adhesive for waterproof bonding and sealing.
_black_")


Application areas
Discover more
High Tack is a single component, waterproof, tencious polyurethane adhesive for high precision plane blocks, insulation panels and for waterproof sealing of wells pipes and water channels. Adheres very well on wood, brick, concrete, cellular concrete, fibre cement, metal, glass, EPS, XPS, PU, rock wool, glass wool, polymeric materials and plastics with the exception of polyethylene, Teflon and silicone. The formulation has been developed specifically to guarantee a reduced post-expansion: the increase in volume (visible only when the product is not immediately compressed after extrusion) is reduced to increase the density and, consequently, the adhesive capacity and tear resistance allowing various type of applications as adhesive. It adheres tenaciously to several types of surfaces and is resistant to the bacteria normally found in the subsoil. High Tack has a very good resistance to water, detergents, micro-organisms and chemical agents. If the hardened product leaks from the laying surface / cavity, it can be cut, drilled, sanded, painted and plastered. The consistency and adhesiveness of the fresh product, the dimensional stability and the mechanical properties of the hardened material make High Tack ideal product for bonding, especially in situations where the weight of the assembled elements prevents expansion and is helping the formation of a compact and continuous polyurethane glue layer.
1 .The substrates must be sufficiently strong, solid, even, clean and free of oil and grease, dust, loose material, dirt of any kind and any traces of old paint. Any type of dirt can affect to adhesion. In order to ensure that the fresh foam has the moisture needed for complete cross-linking, moistening the substrate before application may be useful.
2. Remove the protective cap, overturn the can and place to the gun.
3. Shake the can for at least 15 seconds. Repeat this operation after each working break.
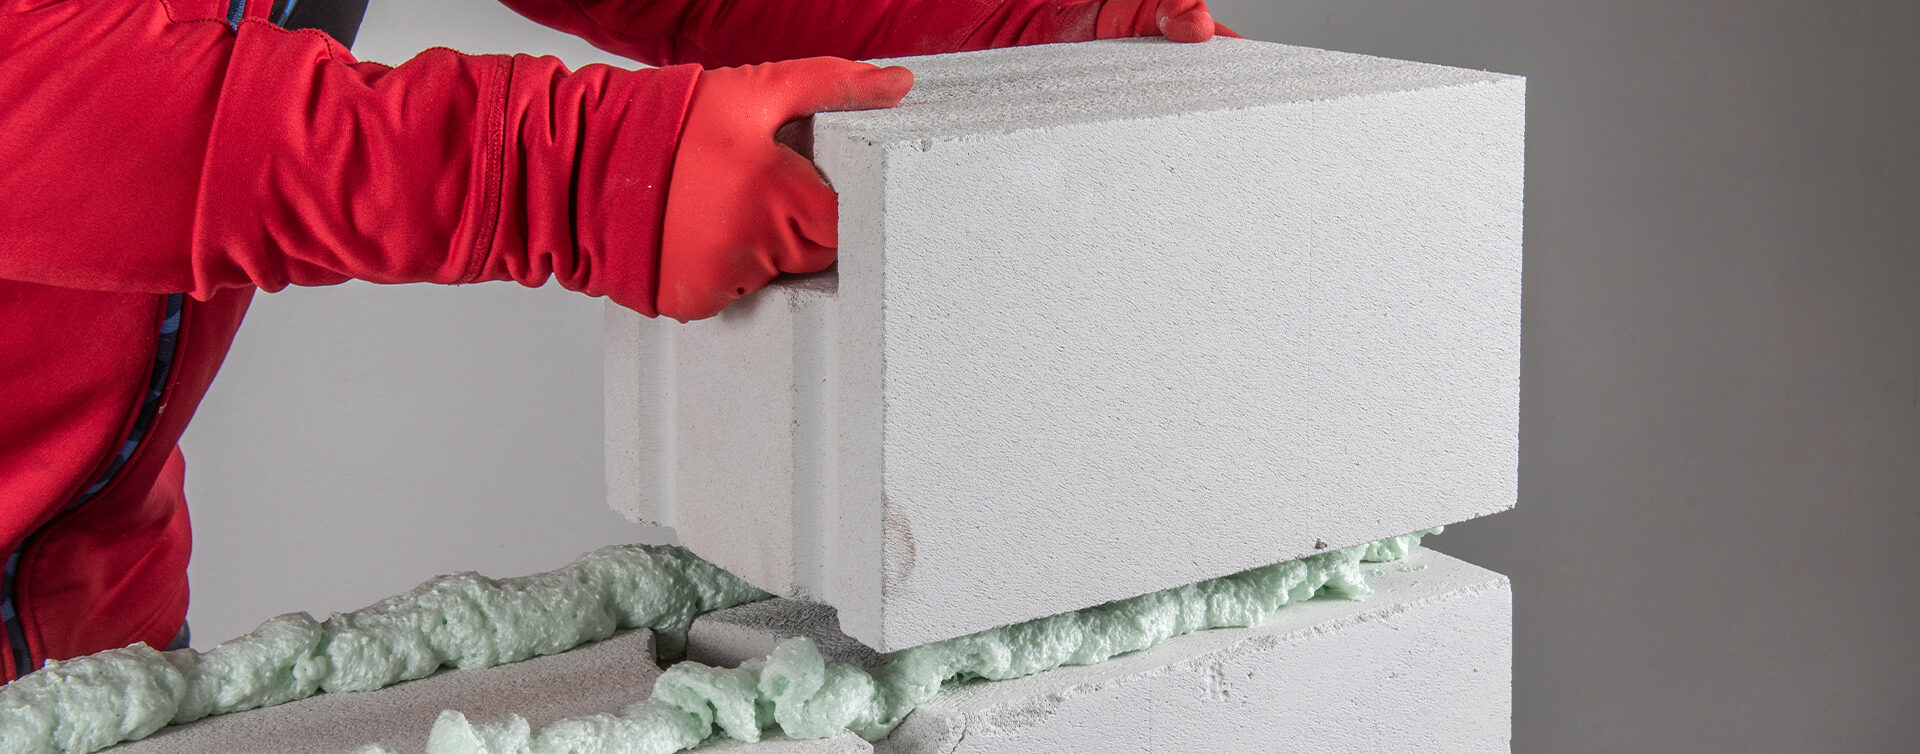
4.1 APPLICATION OF PRECISION PLANE BLOCKS FOR NON-LOAD BEARING MASONRY
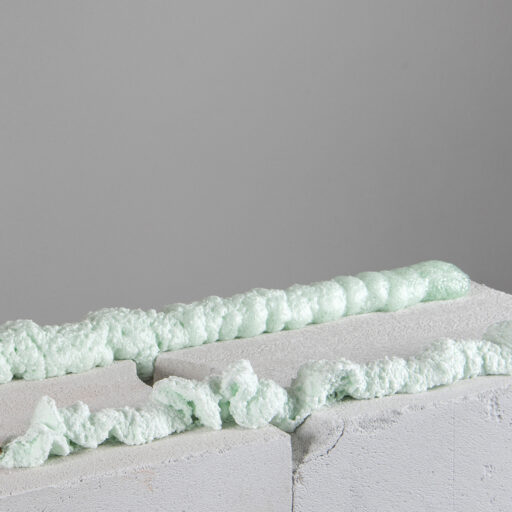
Prepare the foundation by applying a flat mortar bed. Smooth, check that it is perfectly flat using a spirit level. If required by the specifications, lay a strip of sheathing/tar paper to avoid capillary rising of humidity. Lay a bead of material approximately 3 cm in diameter. For edge-ground masonry blocks without holes (cellular, aerated and/or auto-claved types) the diameter of the foam bead can be reduced to approximately 1.5 cm. If you are laying components of curtain or partition walls with thicknesses between 10 and 12 cm, a single bead of product laid along the centre line of the course of bricks will be sufficient. For thicker, non-load bearing walls, use two parallel beads each 3 cm in diameter at approximately 5 cm from the edge. Lay the next course of bricks before the surface of the foam has had a chance to skin over. Repeat this procedure for the remaining courses of brickwork. A masonry made with this technique is homogeneous and continuous and therefore the risk of forming thermal and acoustic bridges is smaller. In addition to being very quick to apply, the product dries and hardens rapidly because, unlike conventional mortars, this polyurethane foam does not wet or dampen the masonry work. Rapid drying and hardening means that users can proceed with successive operations much sooner.
4.2 INSTALLATION OF ISOLATION PANELS
Apply the foam to the back of the panel forming a perimeter bead approx. 3 cm from the edge and at a thickness of 2-3 cm. Apply a bead of the same size at the centre, in the shape of “W”. Wait a few minutes before placing the panel on the wall, then align it with the surrounding panels, but before a surface film has formed on the foam. Press it against the wall and use a fixed base to prevent the panel from sliding. The wait is designed to prevent the post-expan-sion of the foam, even if limited, from causing macroscopic misalign-ments between the installed panels. After 2 hours proceed with mechanical fasteners. The same application technicque can be used for installation of insulated and non insulated plasterboards.
4.3 LAYING / SEALING HYDRAULIC COMPONENTS
Position the first base component. Turn the canister upside down so the valve is facing downwards, point the extension pipe in the direction required and press the dispenser to create a curb with approximately 3 cm of diameter on the upper part along the entire perimeter with interlocking shaping. Position the next rise within few minutes. Repeatthe operation for the next components, rises and/or cover to be laid. This way of applicationd will create a waterproof seal which can resist pressures up to 0.5 bar. In case of pipes, traps and tank connections, insert the pipe or channel in the connection on the trap or tank. Apply a curb of 3 cm (approx.) in diameter in the gaps around the connection until you have filled 50% of the space between the two components to be assembled. After application the foam will expand to completely fill the gap between the two components.The joint filled with foam in this way will be waterproof but will not provide a pressure resistant seal. After hardening, any excess can be sandpapered or cut off with a knife or alternatively when using protective gloves, material can be formed with fingers to more compact form.
5. The foam hardens completely approximately 1 hour after laying. Once the foam has hardened you can sandpaper, cut off and remove any surplus material. Complete curing of the foam takes approximately 24 hours.
6. If the can is not completely emptied, return it to an upright position and press the nozzle for a few seconds. The gas which escapes will clean the valve and gun.
Cleaning the tools
Clean any traces of non-hardened foam (e.g. from clothing, equipment, etc.) by using special cleaner for polyurethane foam. Hardened foam must be removed mechanically only (e.g. scraped off or sanded).
Keep in a cool place in an upright position. Avoid storing the canister in a horizontal position, as incrustations rapidly form under the valve which will irreparably compromise the extrusion of the foam. High Tack has a shelf life of at least 12 months if stored upright in a cool (at a temperature below 25°C) and dry place.
The yield of the foam depends greatly on the temperature of the can and the substrate. At low temperatures both the output pressure of fresh material from the valve and the amount of hardened foam are greatly reduced and the post-expansion increases. To obtain a good yield, the recommended temperature for can is approx. 20 °C.
Do not use this product for:
In case of any doubt, please contact the Technical assistance of Torggler S.r.l..
On substrates that are completely soaked in water, as this situation can create a barrier that can
affect the adhesion of the foam to the substrate.
The High Tack can is a pressurized container. Protect from sunlight and do not expose it to temperatures above 50 °C. Do not puncture or burn, even after use. Do not spray over an open flame or on an incandescent element. Keep away from all sources of combustion. No smoking. Keep out of the reach of children. This product contains flammable components, so only use it in well-ventilated areas. There is the risk that explosive vapour/air mixtures may form, especially if more than one canister is used in the same location. Contains diphenylmethane-4,4’-diisocyanate (EEC no. 615-005-00-9). Extremely flammable. Harmful by inhalation. Irritating to eyes, respiratory system and skin. In case of contact with eyes, rinse immediately with plenty of water and seek medical advice. After contact with skin, wash immediately with plenty of soap and water. Wear suitable protective clothing and gloves. In case of insufficient ventilation wear suitable respiratory equipment. In case of accident or if you feel unwell seek medical advice immediately (show the canister where possible).
| Color | Code | Application | Packaging | Packaging size | Pallet | Barcode |
|---|---|---|---|---|---|---|
| Light blue | 5337 | Gun application | can | 12x750 ml |
42 cardboards
|

|
Filling and plugging of gaps between walls and pipe penetrations.
| PARAMETER AND TEST METHOD | VALUES |
| Color | Blue |
| External temperatureduring application | from -5°C to +40°C |
| Operating temperature | from -40°C to +120°C |
| Skin-over at 23 °C and 50% RH (MIT 87*) | 7 – 10 minutes |
| Curing time (bead with 20 mm diameter at 23 °C and 50% RH) (MIT R/8*) | 30 – 40 minutes |
| Density (after non-free foaming) (MIT 50*) | 13 – 18 kg/m3 |
| Dimensional variation (at 23 °C and 50% RH) (MIT 52*) | <3% |
| Fire resistance (DIN 4102) | B2 |
| Linear yield (3 cm) (MIT 119*) | 40 – 50 m |
| Adhesion to polystyrene (0,2 N/mm2) (ETAG 004) | 0,2 N/mm2 (breakage of panel) |
| Seal under pressure (EN 1610) | 0,5 bar (method W) |
| UV ray resistance | poor, tends to yellow |
* I Torggler internal methods are available on request.
Consumption of High Tack varies according to the type of element and/or application method. Approximate consumption of 1 can is 5 a 10 m2 of masonry or 8 to 12 m2 bonding of insulation panels.
Contact our team for personalized support and product guidance.